Welcome to HubSpot!
This guide will walk you through the essential setup steps to get you productive from day one. Complete these tasks in order, and you'll be ready to start managing your contacts and deals effectively.
Basic Account Setup
The very first thing you should do when you get access to HubSpot is setup your user profile and update your account preferences. Here's how:
Login & Profile Setup
- Access your HubSpot account using your Orchestra credentials. Log in here.
- Update your profile clicking on the gear icon in the upper right of the top navigation bar
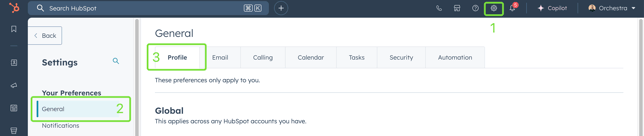
- Complete your user profile by entering your first name, last name, and phone number
- For Sales Hub users, we recommend that you upload your Orchestra headshot (or another professional profile photo)to your profile
We strongly recommend you enroll in two-factor authentication (2FA). You can do this via the HubSpot mobile app or via any other standard 2FA.
Email Integration
Users with Sales Hub access will need to enable the email integration with Gmail (or Outlook) to make it as efficient and easy as possible to log and track emails, meetings, and other interactions with clients and prospects. The purpose of this email integration is to track business development-related emails and activities. You are not required to track every email that reaches your inbox.
Your email integration will allow you to add contacts and companies directly from your inbox, and access valuable CRM data without having to navigate to HubSpot while you work. This will also help us track and log important email interactions with clients and prospects so you don't have to manually log those interactions in the database. Here's how to get started.
Connect Your Email Account
- Navigate to Settings > General > Email
- Click Connect Personal Email (in this case "personal email" means your individual work email address as opposed to an email alias)

- Check the box for Turn on inbox automation in the pop up window
- Click Connect your inbox
- Enter your work email address
- Click the Connect to Gmail button and follow the steps as prompted to grant HubSpot access to your email account
- After connecting your inbox, you'll be asked to download the HubSpot Sales Chrome Extension. Follow those instructions or add the HubSpot extension to your browser from the Chrome store.
Pro-tip: If you have multiple email addresses, like a berlinrosen.com email and an orchestraco.com email, please add the other one as an alias! This will allow you to switch email addresses when you're sending messages from HubSpot.
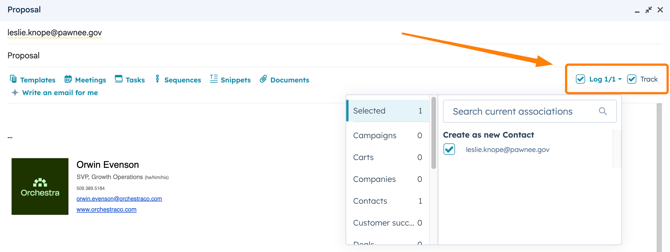
Email Logging and Tracking From Your Inbox
Now that your inbox is connected to HubSpot, you'll be able to easily track and log emails directly from your inbox. By default, emails will not be tracked or logged in the CRM until you add them by checking the boxes from your email composer.
For more information about logging and tracking emails, you can learn more at the Knowledge Base article here.
🔎 Vocab Lesson 🔎
When you log an email, you save a copy of that email (and its thread) to an associated record in HubSpot. When you track an email, you'll get insight into how the recipient engages with your email. You'll be able to see whether and when the recipient opens the email, clicks a link, or downloads a document from your email on their contact record.
Calendar Integration
HubSpot will only sync with the primary or default calendar. Additionally, events created before you connect your calendar won't sync to HubSpot. This is true even if guests for such events exist as a contact in your HubSpot account and have the same email address in the Email property. Only events created in Google and Office 365 while the integration is active will be synced to the contact's timeline.
Connect Your Calendar
- In your HubSpot account, click the Marketplace icon marketplace in the top navigation bar,

then select HubSpot Marketplace.
- Search for the Google Calendar integration, and select Google Calendar in the results.

- Click Install.

- In the Connect your calendar pop-up window, select Google/Gmail. Then click Connect your calendar.

- You'll be redirected to Google to sign in or choose a Google account if you have multiple accounts (choose the Google account associated with your HubSpot login).
- Click Allow.
Mobile Setup
The HubSpot mobile app puts your CRM in your pocket, giving you instant access to contacts, deals, tasks, and dashboards wherever you are. With the app, you can update records on the go, log calls and in-person meetings in real time, and stay on top of reminders. It’s designed to save you time, reduce duplicate work, and make it easier to keep Orchestra’s business development efforts moving forward, even when you’re away from your desk.
Use the following QR code to download the app on your phone, and learn more about installing the mobile app here.

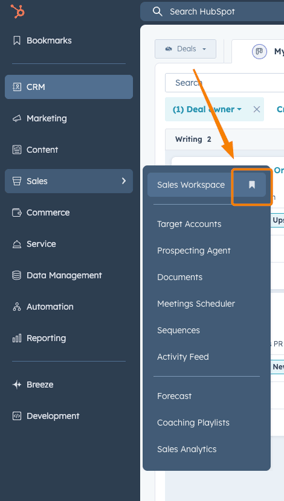
Bookmark Key Dashboards and Sections
Bookmark the site sections you’ll use most often so they’re always just a click away. This helps you quickly see the metrics that matter most to your role without having to dig through menus.
In the left hand navigation menu, just hover on your favorite section and click the bookmark icon (left) to make it appear in your bookmarks bar (right):
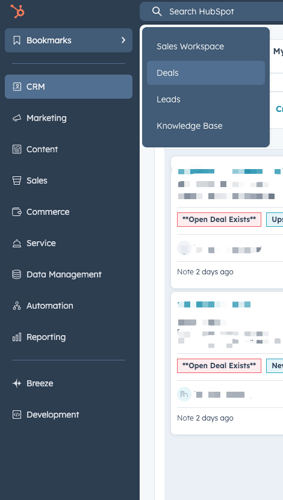
Pro-tip: Orchestra's HubSpot Knowledge Base is located under the Service tab. We recommend bookmarking this for easier access.
Set Notification Preferences
Customize your notification settings for email, browser, and mobile so you only get the alerts that are most useful to you. This way, HubSpot keeps you informed without overwhelming your inbox.
Click the bell icon in the top right corner and select the gear icon in the subsequent pop-out panel. From there, adjust your email, browser, and mobile settings so you only receive the alerts that are most helpful to your work.
✅ Checklist for Day 1
-
Log in to HubSpot with your Orchestra credentials
-
Set up your user profile (name, photo, signature, etc.)
-
Enable two-factor authentication (2FA)
-
Connect your email inbox to HubSpot
-
Download and log in to the HubSpot mobile app
-
Bookmark your key dashboards for quick access
-
Set your notification preferences (email, browser, mobile)